
This is an old revision of the document!
Table of Contents
Getting Started
This is a brief tutorial on how to setup your landscape images and logos with a piece of free online software called “Pixlr Express”. For the majority of this tutorial, we'll be focussed on the landscape images; however, both procedures are nearly identical, so you may simply repeat these steps for the logo. To get started, you'll need two pieces of information:
- The name of the template you're using: Miranda, Miranda Thin or Molly. A list of all Real Geeks templates is available at http://www.realgeeks.com/designs/.

Now we simply need to determine the dimensions of our landscape image. Please see Landscape Image Minimum Requirements to find this information specific to the template you are using.
Using Pixlr Express
Navigate to http://pixlr.com/express to get started. You'll be presented with a splash page like the one below.

Click on “Browse” in the bottom left to upload an image from your computer. Make sure the image you have is at least the size of your required landscape image requirements.

You'll start off with a window, like the one above. By clicking on the “Adjustment” button at the bottom, you'll be presented with a number of tools you can use to modify your image. You'll only need “Crop” and “Resize” for the purposes of this tutorial, though.
To resize your image, you'll use any combination of these two tools.
Resize
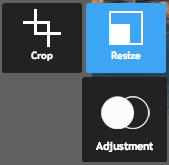
Resizing is like what a photographer does when they give you multiple sizes of the same image. They're proportioned the same, but are bigger or smaller than the original.

You likely won't be able to just resize the image to the size you need. You can make it smaller, but you will probably have to crop it as well. To resize, simply adjust the width OR height (not both) in the boxes below the image. Don't touch any of the other buttons! When you adjust one or the other, you must make sure that the corresponding sizes are not smaller than the required dimensions. Once you're done, click apply and then proceed to crop the image to the exact dimensions you need.
Crop

Cropping is like taking scissors to your picture. You're effectively just getting a piece of the image instead of the whole thing. This is useful if you want to snip out a person from a group photo, change the focus of an image to a house instead of the trees around it, or hide some cars in the driveway of a property.

To crop an image to the landscape image size, input the width and height in the boxes below the image. Don't touch the other buttons. The selected button should be “X:Y”! Once you've adjusted the size, just move the box around by dragging-and-dropping it to the image you would like. When you're happy with the result, click on “Apply” in the bottom-right.
Saving the Image
Once you've resized your image to the correct size, click on “Save” in the top-left of your window. You'll be taken to a screen like the one below.
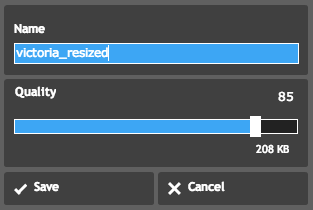
Enter a filename into the box above. In this case, we've named our file “victoria_resized”. Click on “Save” and you're done!
Uploading the Landscape Image
Navigate to your site backend, which is at http://yourdomain.com/admin (ie. http://www.adrhi.com/admin) and login.
Scroll down to “Site Settings”.

Go to the “Template Options” tab and scroll down to “Header Image”.

Scroll down until you find the “Header Image” setting and click on the icon to the right of the file-path.
Upload your file, by clicking “Upload” at the top-right of the pop-up window. Select the file by clicking “Browse”, then click on “Upload” in the bottom-right of the pop-up window. When it's finished, simply click on “File Browser” in the top-left of the pop-up. Your new file should appear at the top of the list. Click on the “Select” icon at the far-left of the image. Once you're done, the window should close and you should see a small preview of your image in the settings page. Click “Save” at the bottom of the page and you're done!
Uploading the Logo
Simply repeat the procedure you followed for the landscape image outlined above; however, instead of modifying the “Header Image” setting, modify the “Header Logo” setting.
![]()
The logo dimensions are 400 x 86 pixels.