Table of Contents
Settings
General Settings
Here, you can change your contact information, auto responder email, signature, and round robin status. Round robin status should be changed if a user is going on vacation (set to Not Available), or moving to another area and would like the geographic round robin lead assignment method to assign him leads in the new area.
Notifications
This is just a set of checkboxes representing each event that can generate a notification. If you'd like to be notified by email each time a given event occurs, tick the corresponding checkbox. After you're done ticking and un-ticking checkboxes, the box should change into a green box. This means that your changes have been saved.
Lead Assignment
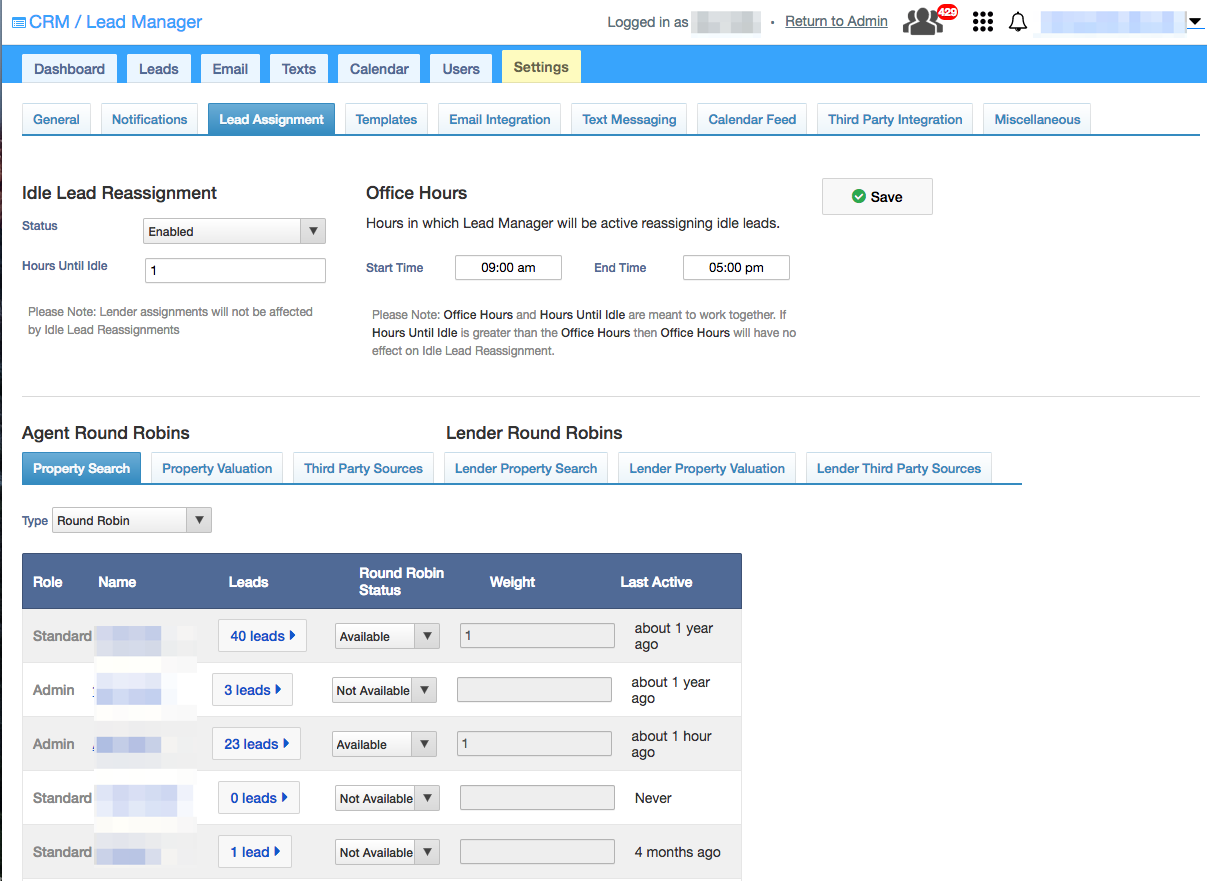
A lead comes into the system unassigned. If the lead assignment method is anything but manual, the lead is automatically assigned to a user (exactly how this is done depends on the method in use, details below). Then, the lead is considered new until the user changes it in some way, for example by adding an activity or scheduling a followup. If a lead stays new for a period of time defined in the Hours Until Idle field under the Lead Assignment subtab of the Settings tab, it will automatically be reassigned. Both the user who lost the lead and the user who gained the lead will be notified.
Methods of lead assignment
The admin can configure this in the Settings tab, Lead Assignment subtab.
- Manual: admin must choose a user for unassigned leads manually by choosing someone from the lead's User drop-down
- Round Robin: for the set of users {A, B, C}, lead #1 goes to user A, #2 to b, #3 to C, #4 to A, #5 to B, #6 to C…
- Weighted Round Robin: like round robin, but a user with a relatively higher weight gets more leads than a user with a relatively lower weight
- Geographic Round Robin: like round robin, but leads are tagged with a geographic area, and assigned only to users in that area (set in the users profile with a field labelled Round Robin Status)
- Weighted Geographic Round Robin: a combination of the two above
Users whose Round Robin Status is set to Not Available are skipped by the four round robin methods.
Round Robins For Different Lead Sources
There are three different sources from which leads will get added to the Lead Manager, each of them have a separate Round Robin.
- Property Search: Leads that come in from searching for properties on your Real Geeks website.
- Property Valuation: Leads that complete a property valuation inquiry using the property valuation tool on your Real Geeks website.
- Third Party Sources: These leads are sent to the lead manager from lead generation tools outside of Real Geeks. You can manage them at our Lead Router control panel.
Current third party lead sources:
- Zillow
- Trulia
- Realtor.com
The lead routing process requires different inputs for each source and can be set up within the Lead Manager under Settings > Lead Assignment > Third Party Sources.
Templates
Here, you will be able to create email and text templates as well as how to set up text auto responders.
Click here to learn about email and text templates.
Click here to learn about sign up responder texts.
Email Integration
Use this feature to send emails directly from the lead manager via your preferred email account.
We've built our own Email Sync that can record both incoming AND outgoing emails with your leads outside the CRM. It uses your GMail or Microsoft integration for sending Email. Messages take about 5 minutes to show up in the activity history.
Click here to learn more.
Text Messaging
Here, you can enable texting, and contact your leads in an awesome way to turn real estate internet leads into hot appointments and convert them into sales
Click here to learn more.
Calendar Integration
This is where you can set up syncing your personal calendar to appear in the “Calendar” tab in the lead manager.
Click here to learn more.
Third Party Integration
You can use other lead generation websites to send leads into your CRM. You can send leads from your Website as they come in to one of the destinations we integrate with.
To learn more, click here.
Customizable Lead Attributes
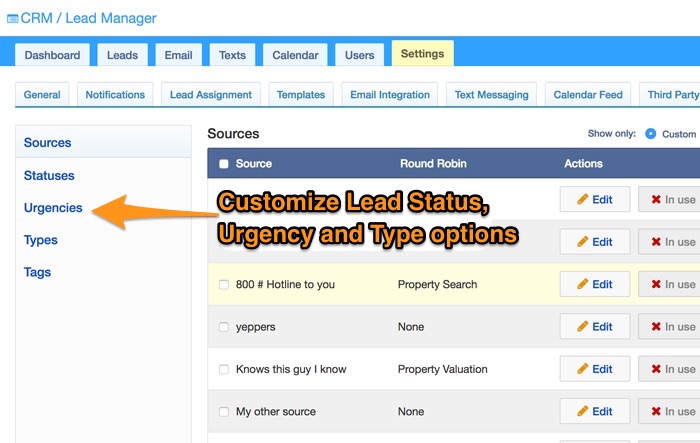
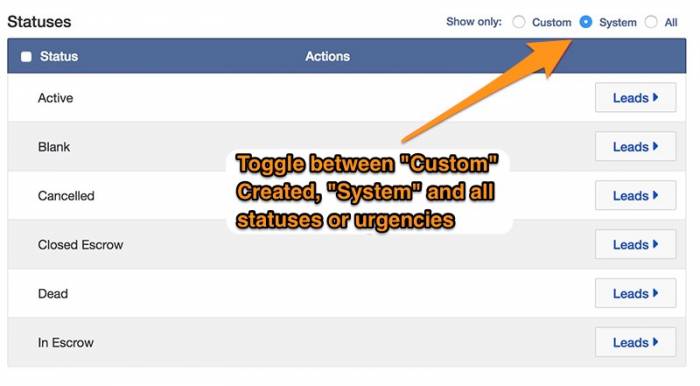
Customize has replaced the Miscellaneous page and this is where Additional Sources, Statuses, Urgencies and Tags can be managed. To manage these customizable attributes in the Lead Manager, simply go to Customize under the Settings tab. Navigating this page via the sidebar on the left allows switching between each customizable attribute. Each attribute table here defaults to only showing the company's custom attribute (source, status, etc), but switching between Custom, System and All can easily be done by using the radio buttons on the top-right of the attribute table.
Managing Custom Attributes
Create, Edit and Delete
Create a New Source, Status, etc by clicking the New button in the grey box to the far right, then type in a name and click Add button.
Edit an existing attribute, by clicking the Edit button in the corresponding row of that attribute. The form to edit this attribute will appear in the grey box to the far right.
After creating or editing a(n) Source, Status or Urgency it will now be available when creating or updating a lead exactly the same way that system attributes have always been in the Lead manager
Delete an existing attribute by using the Delete button in the corresponding row of that attribute. Sources, Statuses and Urgencies cannot be deleted if they are currently being used by one or more leads. Merging this attribute into another is the best way to remove unwanted values that are already in use.
Merging and Bulk Delete
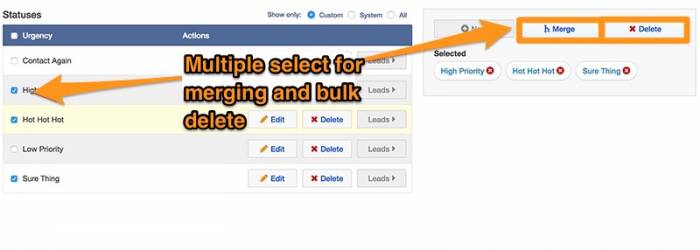
Merging custom attributes can be accomplished by checking the check box to the left of each attributes' name and clicking the (now enabled) Merge button in the grey box to the right. A prompt will appear asking which attribute the others should be merged into. Select Other and fill in a new name if desired.
Upon successful merging, all leads associated with now removed Source, Status, etc will now belong to the attribute that was merged into.
Example: Merging status Lost with 3 leads and Missing with 1 lead into Disappeared with 4 leads will result with Lost and Missing being removed and Disappeared having 8 Leads.
Bulk Deleting custom attributes can be accomplished by checking the check box to the left of each attributes' name and clicking the (now enabled) Delete button in the grey box to the right. A prompt will appear to verify the action about to be taken, much like bulk deleting leads on Leads List page.
Disable System Attributes
System Statuses, Urgencies and Types can be disabled for the company and will prevent these values being available for the creating leads manually in the Lead Manager.
There are a few of these values that cannot be disabled due to the Lead Manager requiring them for such things as Round Robin, determining whether an incoming lead is a Potential Seller Lead, etc. A brief list of these include:
- Status
- Blank
- Active
- Types
- Buyer
- Seller
Things to note:
- For sources, adding a Round robin is an option. Selecting a round robin for a source means that any lead created outside of the Lead Manager with that source will be placed in the proper Round Robin for agent assignment.
- Tags cannot be created from this screen. Tags are created on the Lead Detail page and must be attached to a lead upon creation
- All attributes must be unique. A validation error will occur if a similar value has already been created or is a Lead Manager system value.


